Check Hosts
Check Hosts define the actual hosts and containers where your synthetic checks will actually be run. Each check can be assigned into an individual Check Host all a collection of Check Hosts called a Host Group.
There are two types of Check Host:
- Controller
These primarily provide the web console and API interfaces to allow EndPoint Monitor to run and be configured, and also handle other tasks such as check scheduling and housekeeping. At least one controller is required for any EndPoint Monitor installation, running at least two is recommended where high availability is required.
They are also capable of running checks, and for minimal installations you may only need a controller.
Controllers require a connection to a MySQL database, and for users to be able to access them through a web browser either directly or through a reverse proxy or load balancer. See Getting Started for more information on requirements. - Agent
Agents solely have the job of running synthetic checks. They can be useful to distribute out across a network if monitoring internal applications and infrastructure, or you want to be able to monitor from different locations, and being more lightweight are more suitable for scaling than adding controllers.
They only require access to a Controller to be able to work, and can be dynamically added and removed using the auto-registration option. - Android
Android hosts are a specific type of agent that is configured to run Android Journey checks only. These are separately defined hosts due to the unique setup required to allow these checks to run, and are only provided as managed Docker images, and are only supported running on Linux.
Additionally Android hosts require virtualisation to be able to run the virtualised Android device needed to run the check. This creates limitations on where the Android agent can be run, with many cloud and hosting providers, as well as on-prem virtiualisation solutions not supporting nested virtualisation, this is best run on dedicated devices.
Like agents, this also requires access to a Controller to work, but can be dynamically added and removed using the auto-registration option.
Adding Check Hosts
Check Hosts can be created through the web console, through the API or using Terraform. Additionally, you can configure hosts to auto-register, see getting started for more details.
The below instructions describe how to add a Check Host through the web console:
- Login to Web Console and select Check Hosts from the main menu.
-
Click
Add located towards the top left of the web console. -
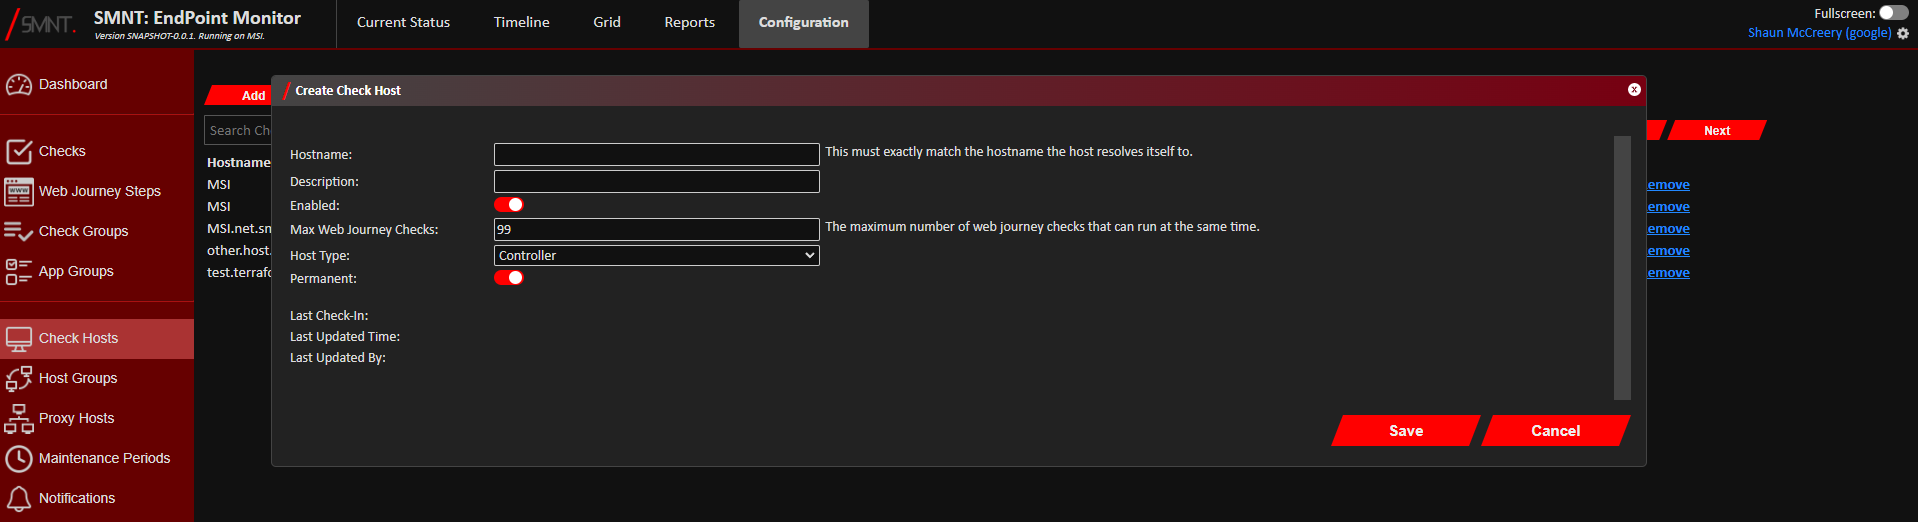
The Create Check Host window should now show.
Add the information for the new Check Host. Definitions of each of the fields can be found here.
- Click
Save . - You should now see confirmation that the Check Host was successfully created in the bottom right notification area
in the web console.
If the host added was an agent, then you should now see the generated private key for it. Copy this and save it somewhere safe and secure ready to add to your agent configuration.
The Check Host should now be ready to use and assigned to Checks or Host Groups.
Amending Check Hosts
- Login to Web Console and select Check Hosts from the main menu.
- Check
Edit on the row of the Check Host to update.
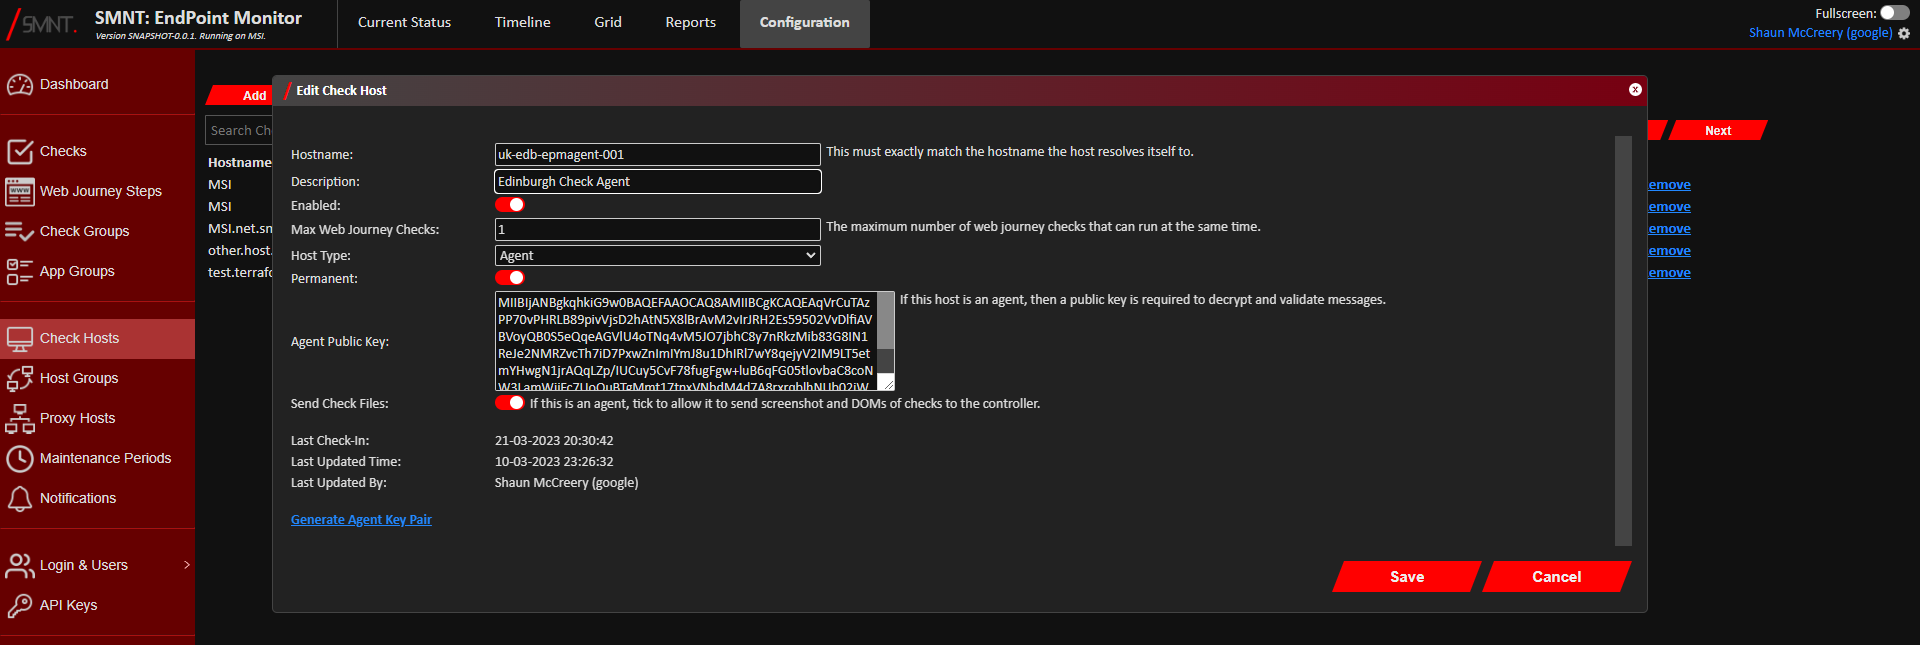
You can filter our the list of Check Hosts shown by hostname or description using the search bar. - Make the amendments required to the Check Host. Definitions of each of the fields can be found here.
- Click
Save . - If a replacement private key is required for an agent, click
Generate Agent Key Pair . A message will then be displayed with the new private key. Copy th is and save it securely ready to be added to the agent configuration. Doing this will revoke the previous key pair once saved. - You should now see confirmation that the Check Host was successfully updated in the bottom right notification area
in the web console.
Changes should take effect immediately, although any checks in flight on the Check Host will continue to complete if the Check Host was disabled.
Removing Check Hosts
- Login to Web Console and select Check Hosts from the main menu.
- Check
Remove on the row of the Check Host to update.
You can filter our the list of Check Hosts shown by hostname or description using the search bar. - Click
Remove to confirm you want to delete the selected Check Host. - The Check Host should now be deleted and will immediately become unavailable. You should see confirmation of its
deletion in the notification area in the bottom right corner of the web console.
If the Check Host was still attached directly to a Check, you should see an error message informing that the Check Host could not be deleted because of this.
Configuration Definitions
| Name | Description |
|---|---|
| Hostname | This is the hostname the host running as the Controller or Agent recognises itself as. This can be found by running hostname in a terminal on most major operating systems. |
| Description | Space to provide a meaningful description to other users about this host. |
| Enabled | A toggle to enable or disable the host. If the host is disabled, it will no longer run any checks either directly or part of a Host Group |
| Max Web Journey Checks | The maximum number of Web Journey checks this host can run at any given time. Such checks can be resource intensive, and as such can impact results of other checks running at the same time, so lowering this can help reduce the likelihood of this happening. |
| Host Type | The type of host this will be, either Agent, Android or Controller. See above for what these types do. |
| Permanent | If disabled, EndPoint Monitor assumes this host is transient and will delete it after its been offline for a number of hours. |
| Agent Public Key | (Agents Only) The public key of the agent, used as part of the encryption between agents and controllers. |
| Send Check Files | (Agents Only) If enabled, the agent will send files such as screenshots and captured DOMs back to the controller. This can be disabled if there is a commonly shared file system between the agent and the controllers where these files are already being placed. |
Host Auto-Registration
When running Controllers or Agents in a dynamically scaled environment or on ephemeral hosts, then host auto-registration can be used. Host auto-registration allows hosts to automatically register with pre-assigned Host Groups.
To use auto-registration on Controllers, an AUTO_REGISTRATION_GROUPS environment variable should be set to contain
a comma separated list of Host Group auto-registration id's.
To use auto-registration on Agents, an AUTO_REGISTRATION environment variable should be set to true, an
AUTO_REGISTRATION_GROUPS environment variable should be set to contain a comma separated list of
Host Group auto-registration id's, and an AUTO_REGISTRATION_KEY environment variable be set
with the value of a valid API Key that has write permission. See the
Agent Configuration for more details.