Android Journey Checks
Android Journey checks use pre-defined journeys through an uploaded Android application to check expected interactions
function as required, and that expected content is displayed. The check uses an emulated Android device to perform the
checks which require a specific setup to work, as such these checks will only run on the
Android Check Host type and not on normal Agents or Controllers.
Each Android Journey check is broken down into steps which consist of two main components:
- Checking for displayed content
- Interactions to take within the monitored Android app
These Android Journey Steps can be either custom defined for each step, or shared
Common Android Journey Steps that can be used across multiple steps and checks.
Adding Android Journey Checks
As with all checks, Android Journey Checks, including all their subcomponents such as Android Journey Steps can be added
both by the REST API and using the EndPoint Monitor Terraform provider. This guide will go through adding an Android
Journey Check through the web console.
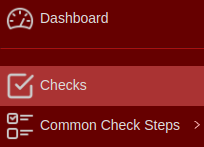
- Login to Web Console and select Checks from the main menu.
- Click Add located towards the top left of the web console.
- The Create Check window should now show. Definitions for each field can be found below under
Configuration Definitions.
Ensure the Check Type is set to Android Journey Check.
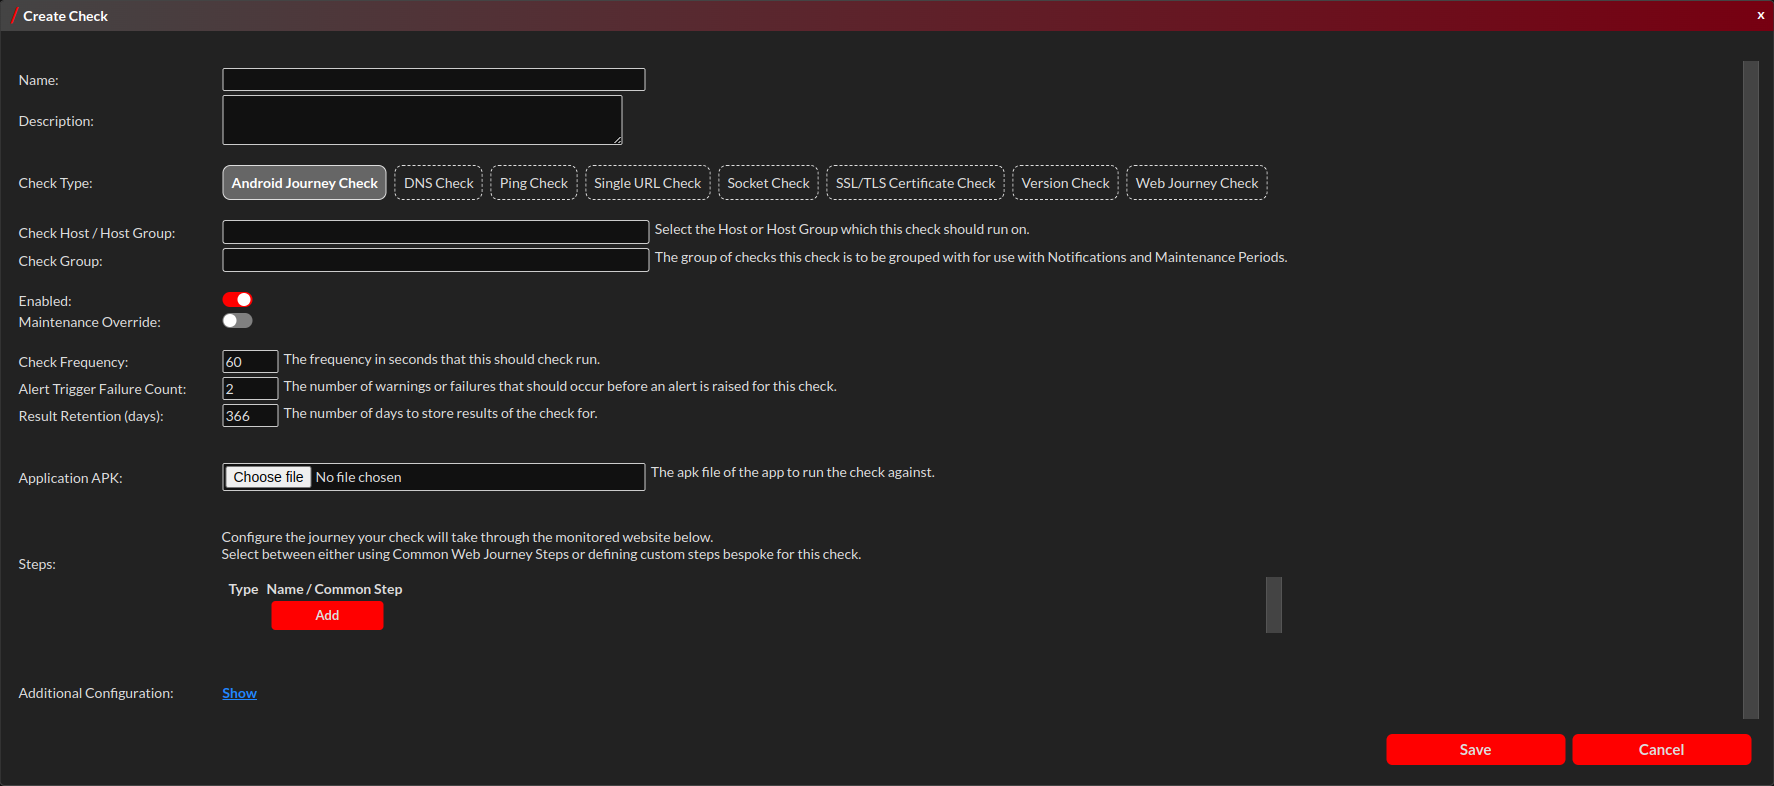
- Click Add to add a first step to the new Android Journey. You can select between a pre-defined
Common Android Journey Steps or creating a custom step for this Android Journey Check
only. For custom steps, click Configure to define the specific checks and actions to take.
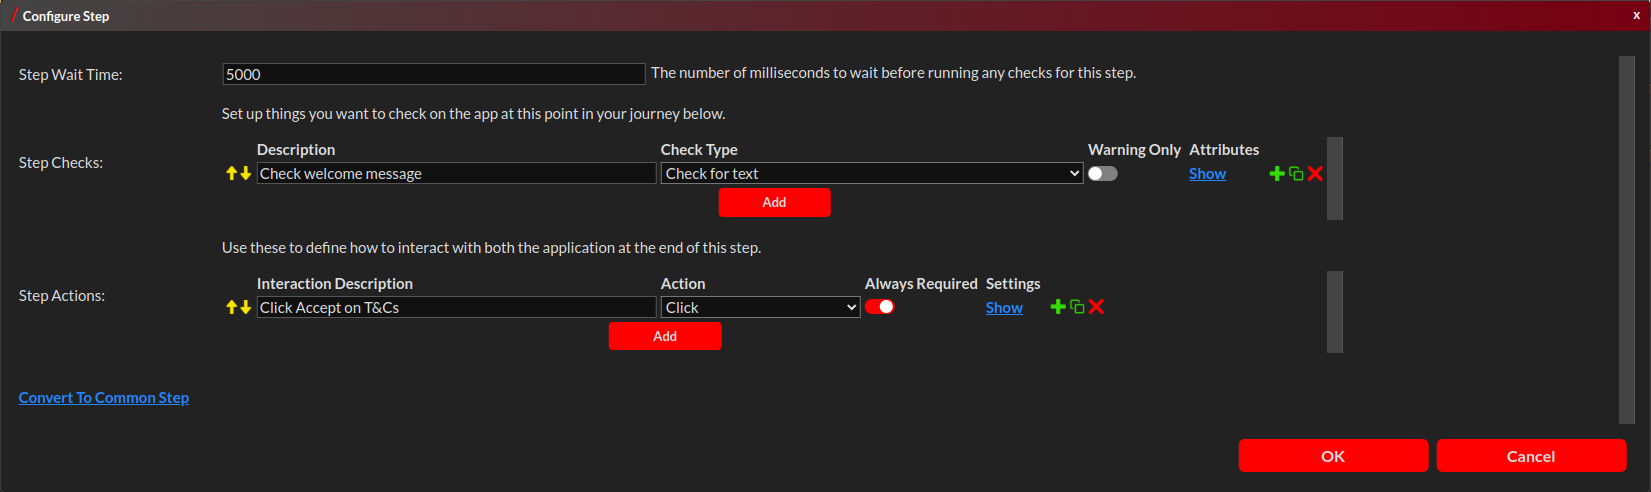
Click OK to return to the main configuration and add more steps if needed. All steps will be run
in the order shown on screen.
- Click Show on Additional Configuration for further configuration options including setting the
initial screen orientation overrides of application launch configuration. See
Android Journey Step Configuration for details on what can be
configured here.
- Click Save to save this new check have it scheduled to start running if enabled.
Amending Android Journey Checks
This guide will go through amending a Android Journey Check through the web console. As with all checks, Android Journey
Checks, including all their subcomponents such as Android Journey Steps can also be managed both by the REST API and
using the EndPoint Monitor Terraform provider.
- Login to Web Console and select Checks from the main menu.
- Click Actions next to the Check you want to edit, and then click Edit.
The list of checks shown can be filtered using the search bar to by the checks name, description, hostname or linked
Check Group or App Group names.
- The Edit Check window should now show. Definitions for each field can be found below under
Configuration Definitions.
Ensure the Check Type is set to Android Journey Check.
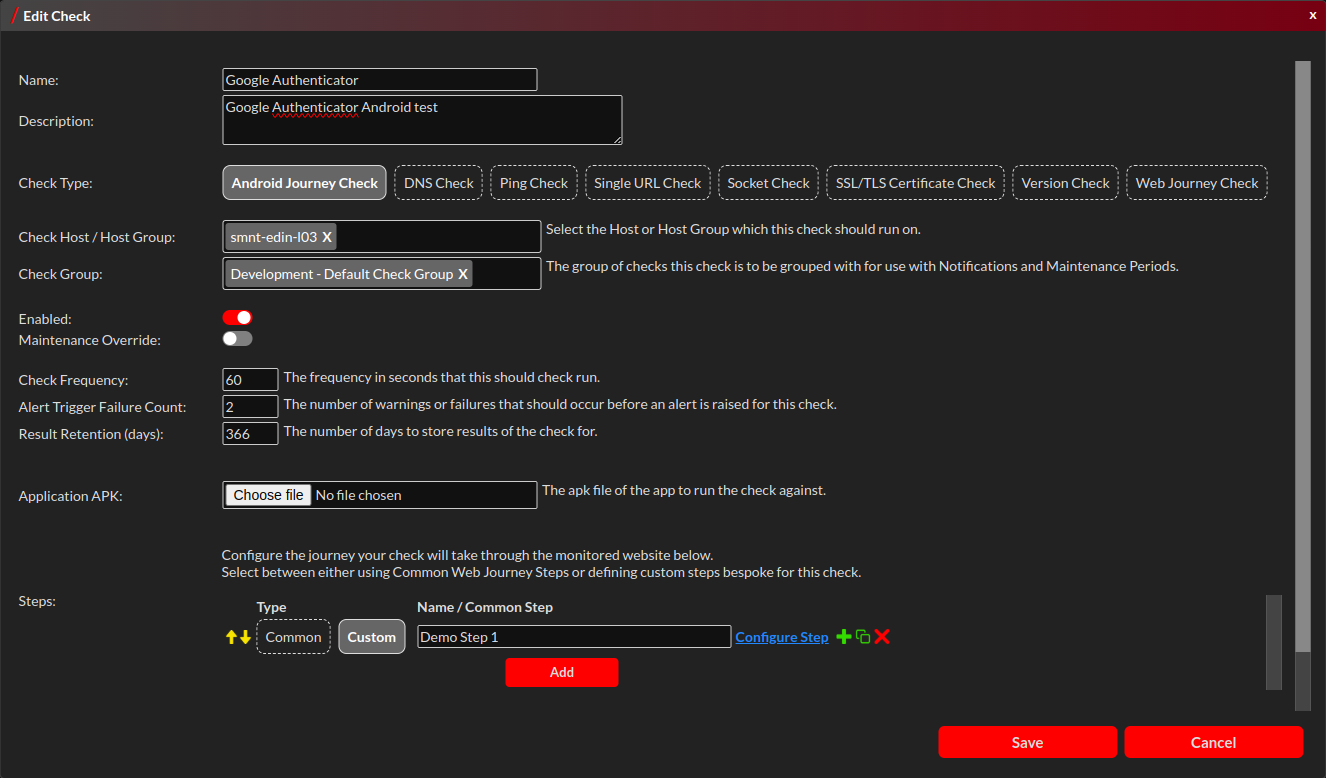
- The list of steps to take, which contain the checks to perform and actions to take within the app, will be listed
under Steps. They will be run in the order shown on screen. The order can be changed using the arrows on the
left-hand side of the list. The right-hand side icons will (in this order) insert a step, copy a copy or remove a step.
You can select between a pre-defined Common Android Journey Step or using a
custom step for this Android Journey Check only. For custom steps, click Configure to define the
specific checks and actions to take.
To convert a Custom Step to a Common Step so it can be used by other Android Journey Checks, click the
Convert To Common Step link when viewing the configuration for the Custom Step to be converted.
Click OK to return to the main configuration and add more steps if needed. All steps will be run
in the order shown on screen.
- Click Show on Additional Configuration for further configuration options including setting the
initial screen orientation overrides of application launch configuration. See
Android Journey Step Configuration for details on what can be
configured here.
- Click OK and Save on any remaining open windows to save any new configuration.
Confirmation of the check being saved will be shown in the bottom-right notification area. Any checks in flight will
continue to run the previous configuration.
Removing Android Journey Checks
- Login to Web Console and select Checks from the main menu.
- Click Actions next to the Check you want to edit, and then click Remove.
The list of checks shown can be filtered using the search bar to by the checks name, description, hostname or linked
Check Group or App Group names.
- Click Remove on the Remove Check conformation prompt.
- Confirmation the check was successfully deleted should show in the bottom right notification area of the web console.
Checks in flight may still try and complete so could still produce an alert shortly after deletion. All result
history of the check will also be removed.
Check Configuration Definitions
| Name |
Description |
| Name |
Provide a name to define what this check is monitoring. |
| Description |
Space to provide a longer description of what the check is monitoring. |
| Check Type |
The type of check this is. This should be set to Android Journey Check. |
| Check Host / Host Group |
The Check Host or Host Group to run this check on. If selecting a specific Check Host, it should be of type Android. If using a Host Group, at least one host within that group should be of type Android for the check to be schedueld to run. |
| Check Group |
The Check Group to assign this check to, which will determine which dashboard it will be shown in. |
| Enabled |
A toggle to enable or disable this check from running. |
| Maintenance Override |
A toggle to manually put the check into maintenance mode. This allows the check to continue running and storing results, but failures will not produce any alerts or notifications, and do not get counted in some reports. |
| Check Frequency |
The minimum frequency in seconds that this check should be run. |
| Alert Trigger Failure Count |
The number of successive failed checks that should occur before an alert or notification is fired. |
| Result Retention (days) |
The number of days that the history of results for this check should be retained for. |
| Application APK |
Select the APK file of the Android app to run the check against. If editing a check, leaving this empty will leave the previously uploaded APK in place, and adding a new APK file will update the current one being used. |
| Steps |
The list of steps to take when checking the given Android app. Further information on how to configure these is under Android Journey Step Configuration Definitions. |
| Additional Configuration |
Click Show to show additional configuration. Definitions of these options can be found under Additional Configuration below. |
Additional Configuration
| Name |
Description |
| Initial Screen Orientation |
Select the starting orientation of the emulated phone when launching the monitored Android app. This must conform to what the monitored app requires, so if the monitored app doesn't allow landscape, and this option is set to landscape, then the check will fail. |
| Override APK Package Name |
Optional override to set the Package Name of the Android app to monitor. If not set, then EndPoint Monitor will try and auto-discover this from the provided APK file, but this can not work in certain situations, which is why an override is provided. More info: https://support.google.com/admob/answer/9972781?hl=en-GB |
| Application Main Activity |
Optional override to set the Main Activity of the Android app to monitor. The Main Activity is essentially the place to start executing the uploaded Android App from. EndPoint Monitor will try and auto-discover this from the provided APK file, but this can not work in certain situations, so this override is provided. More info: https://developer.android.com/guide/components/activities/intro-activities |
Android Journey Step Configuration Definitions
Android Journey Step List
| Name |
Description |
| Type |
Custom - configure a customised step just for this Android Journey.
Common - Use a common shared step as set up in Common Android Journey Steps. |
| Name / Common Step |
If Custom is selected as the Type, then this is a space to provide a descriptive name of what this custom step is doing. If Common is selected as the type, then this space is used to select the Common Android Journey Step to use. |
| Configure Step |
If Custom is selected as the Type, then clicking this will load the configuration of this custom step in a new sub-window. If Common is selected as the type, then clicking this will launch a new browser tab to edit the Common Android Journey Step. |
Android Journey Step Configuration
| Name |
Description |
| Step Wait Time |
The number of milliseconds to wait before starting the step. It can be useful to provide some time to allow the app to continue completing actions from the previous step or to finish any network requests made. |
| Step Checks |
List of things to check on the against what the app is currently displaying. See Step Check Configuration for details. |
| Step Actions |
List of actions to make within the app being checked, such as clicking or swiping. See Step Action Configuration for details. |
Step Check Configuration Definitions
| Name |
Description |
| Description |
Space to provide context of what the Step Check is doing. This is used on alerts and notifications should this check fail. |
| Check Type |
The type of check this Step Check is to take. See Step Check Types below. |
| Warning Only |
Toggle this on to indicate that if the Step Check fails, that it will only produce a warning and not fail the whole Android Journey check. |
| Attributes |
Click Show to edit the specific details of the Step Check. These details will change for the given Check Type. See Step Check Type Attributes for details. |
Step Check Types
| Name |
Description |
| Check for text |
Check that a specific string of text is showing or not showing at this point in the journey. |
| Check for element |
Check that specific display element is present or not present at this point in the journey. This can be useful when using a simple search by text isn't suffice. What elements are available will also be caught in the 'Captured DOMs' within the Check Results. |
Step Check Type Attributes
| Check Type |
Name |
Description |
| Check for text |
Text To Find |
The text to search for on the app display at this point in the journey. |
| Check for text |
State |
Define if the Text To Find should be present or absent from the app display. |
|
|
|
| Check for element |
XPath To Find |
The xpath to use to locate the element to check. If the xpath returns multiple elements, the first will be used. Using the 'Captured DOMs' in the Check Result History can help in forming the required xpath. |
| Check for element |
Component ID |
The component id of the element to check. Within the 'Captured DOMs' output, this wil be displayed as the resource-id. When giving the component id, the package name prefix should not be provided. For example, you may see a resource-id of resource-id="com.myapplication.package:id/action_bar_root", so the component id here is just action_bar_root. |
| Check for element |
Component Type |
For future use, currently will do nothing. |
| Check for element |
State |
Present - The element searched for should be found on the current page.
Absent - The element searched for should not be found on the current page. |
| Check for element |
Object Attribute Name |
Check that the found element has the given attribute name. Not applicable if the State is set to Absent. |
| Check for element |
Object Attribute Value |
Check that the attribute given in Object Attribute Name has this value. |
Step Action Configuration Definitions
| Name |
Description |
| Interaction Description |
Space to provide a description of what the action is doing. If the action failed, this will be what is described in the alert or notification. |
| Action |
The type of action to perform. Descriptions of these can be found under Step Action Definitions. |
| Always Required |
If this is toggled on, the action must always be able to run during the check. If toggled off then if it failed, it's failure will be ignored, allowing for optional actions such as closing intermittent popups. |
| Settings |
Click Show to provide further details for the action to run, such as the element to click on or the text to enter. Definitions of these options can be found under Action Settings Definitions. |
Step Action Definitions
| Name |
Description |
| Click |
A single tap on an element being displayed. This should target tapping on the center of the element found by the criteria given. |
| Input Text |
Enter text into a component within the app. |
| Input Password |
The same as Input Text, however the text to input is encrypted as rest and also prevented from showing in other areas such as notifications and exports. |
| Save View Hierarchy |
Save the current view hierarchy, which is an XML representation of what is currently displayed on the app. More info: https://developer.android.com/studio/profile/hierarchy-viewer |
| Rotate Display |
Rotate the virtual device running the check between portrait and landscape. If the app being checked doesn't support the target orientation, this will always fail. |
| Scroll To Element |
Scroll to bring an element on the current display into view. |
| Select Spinner Option |
Click on a spinner list and select an option by either its position in the list or its name. |
| Swipe |
Perform a single finger swipe across a specified element or the whole screen in a given direction. |
| Take Screenshot |
Save a screenshot of what is currently displayed on the virtual device running the check. |
| Wait |
Wait for a given number of milliseconds. This can be useful if needing to add a pause between any actions that is longer than the default 500ms pause. |
Action Settings Definitions
| Action |
Name |
Description |
| Click |
Component Id |
The component id of the element to click/tap. Within the 'Captured DOMs' output, this wil be displayed as the resource-id. When giving the component id, the package name prefix should not be provided. For example, you may see a resource-id of resource-id="com.myapplication.package:id/action_bar_root", so the component id here is just action_bar_root. |
| Click |
Xpath |
The xpath of the component to click/tap. Using the 'Captured DOMs' output in the Check History can help identify the components available. |
| Click |
Search Text |
The simplest option available is to just search for specific text on the display to click/tap on. |
|
|
|
| Input Text |
Component Id |
The component id of the element to identify where to input the text. Within the 'Captured DOMs' output, this wil be displayed as the resource-id. When giving the component id, the package name prefix should not be provided. For example, you may see a resource-id of resource-id="com.myapplication.package:id/action_bar_root", so the component id here is just action_bar_root. |
| Input Text |
Xpath |
he xpath of the component to identify where to input the text. Using the 'Captured DOMs' output in the Check History can help identify the components available. |
| Input Text |
Input Text |
The text to input. |
|
|
|
| Password Input |
Component Id |
The component id of the element to identify where to input the password. Within the 'Captured DOMs' output, this wil be displayed as the resource-id. When giving the component id, the package name prefix should not be provided. For example, you may see a resource-id of resource-id="com.myapplication.package:id/action_bar_root", so the component id here is just action_bar_root. |
| Password Input |
Xpath |
he xpath of the component to identify where to input the password. Using the 'Captured DOMs' output in the Check History can help identify the components available. |
| Password Input |
Input Password |
The password to input. This will be encrypted where stored, and not shown in any notifications or configuration. |
|
|
|
| Rotate Display |
Rotate Orientation |
The orientation to move the display to. The app being checked must support the given orientation or the action will fail. |
|
|
|
| Select Spinner Option |
Component Id |
The component id of the spinner to select a value from. This can be identified using the 'Captured DOMs' output looking at the Check Result History, and will be identified as the resource-id. When specifying this, the package name prefix should not be provided. or example, you may see a resource-id of resource-id="com.myapplication.package:id/spinner_options", so the component id here is just spinner_options. |
| Select Spinner Option |
Xpath |
The xpath of the spinner to select a value from. |
| Select Spinner Option |
Search Text |
The text of the currently shown value in the spinner to select from. |
| Select Spinner Option |
Spinner Option List Position |
The position of the value to select from the list of options given when clicking on the spinner, starting from 0 (so 0 will be the first option in the list). |
| Select Spinner Option |
Spinner Option Text |
The text/name shown for the option to select from the list presented by the spinner once clicked. |
|
|
|
| Swipe |
Component Id |
The component id of the element to start the swipe action from within. The actual start position will be the extreme opposite side of the swipe direction, e.g. if swiping right, the swipe will start on the extreme left of the component given. |
| Swipe |
Xpath |
The xpath of the component to start the swipe action from within. The actual start position will be the extreme opposite side of the swipe direction, e.g. if swiping right, the swipe will start on the extreme left of the component given. |
| Swipe |
Swipe Start Coordinates |
The specific x,y screen coordinates to start the swipe from. This can be used as an alternative to needing to identify a component to swipe from. |
| Swipe |
Swipe Direction |
The direction in which the swipe will happen. |
| Swipe |
Swipe Length |
The distance the swipe action should travel across the screen in pixels. If this distance results in the swipe travelling off the screen, the action will fail. |
|
|
|
| Wait |
Wait Time |
The number of milliseconds to wait before continuing onto the next action or Android Journey Step if it's the last action to run. |