Common Web Journey Steps
Common Web Journey Steps can be used to configure sharable Web Journey Steps that can be used across any number of Web Journeys, including being repeated within the same Web Journey. This reduces the amount of duplication that may need to be configured when setting up multiple Web Journey checks on the same website, and are great for common actions such as closing cookie popups and log in flows.
Adding Common Web Journey Steps
Common Web Journey Steps are able to be programmatically configured using the REST API and Terraform Provider as well as manually through the web console. This guide will go through adding a Common Web Journey Step through the web console.
- Login to Web Console and select Web Journey Steps from the main menu.
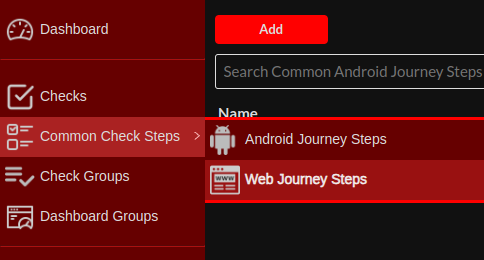
- Click
Add located towards the top left of the web console. - The Create Common Web Journey Step window should now show. Definitions for each field can be found below under
Configuration Definitions.
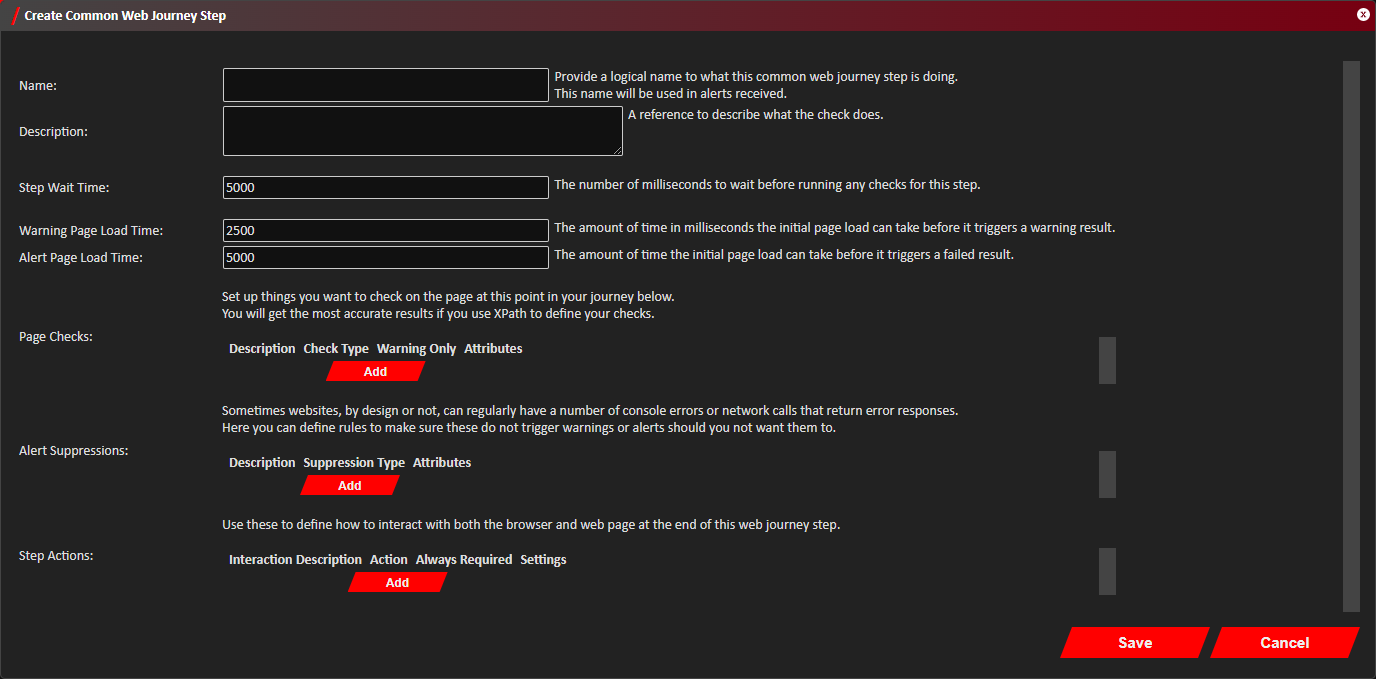
- Click
Close on any remaining open attribute windows, then clickSave to save the new Common Web Journey Step itself. - Confirmation of the Common Web Journey Step successfully being added will show in the bottom-right notification area of the web console. The Common Step will be available immediately to use in any new or existing Web Journey Checks.
Amending Common Web Journey Steps
Common Web Journey Steps are able to be programmatically configured using the REST API and Terraform Provider as well as manually through the web console. This guide will go through amending a Common Web Journey Step through the web console.
- Login to Web Console and select Web Journey Steps from the main menu.
- Click
Edit on the row of the Common Web Journey Step to amend.
The list of Common Web Journey Steps shown can be filtered by name or description using the search bar. - The Edit Common Web Journey Step window should now be shown.
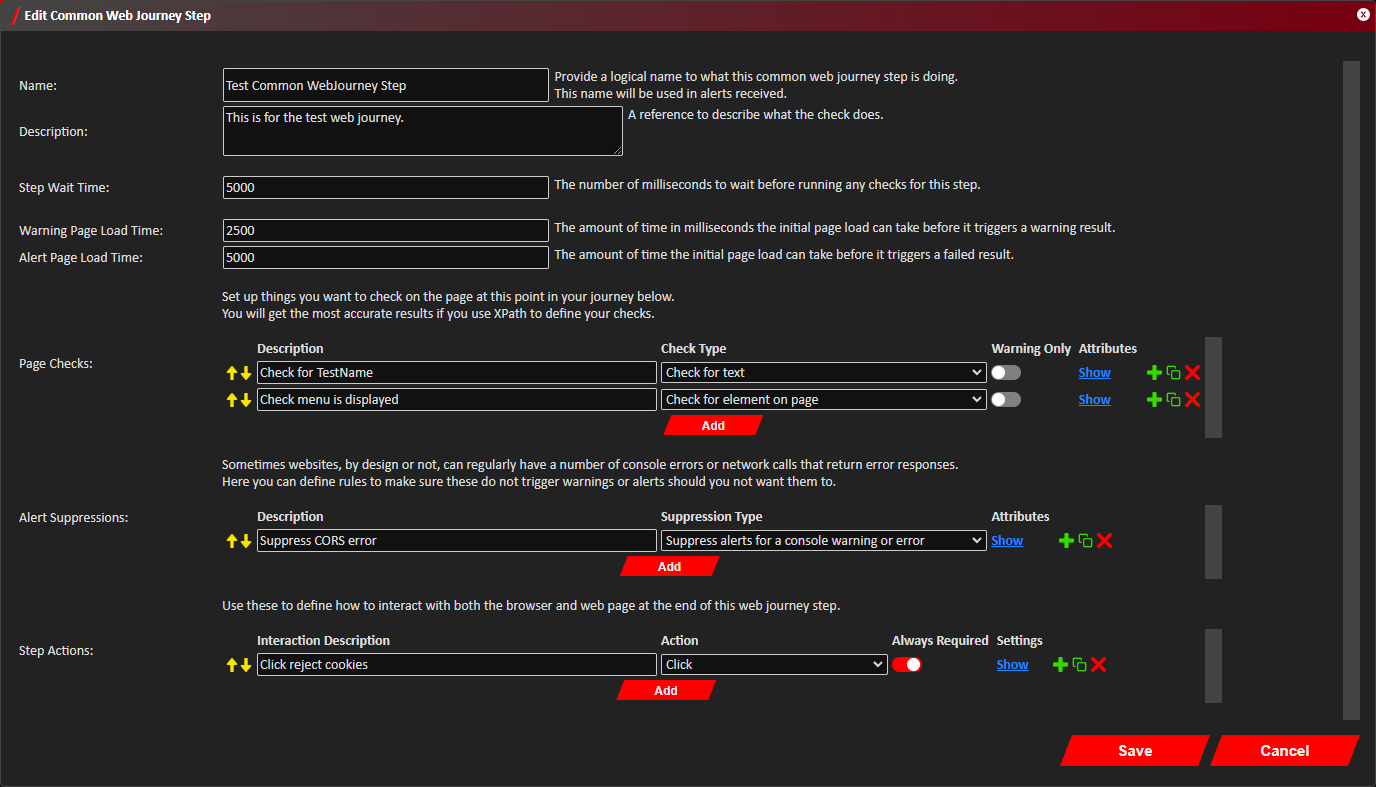
Amend the step as required. Definitions of all the configuration options available are defined below. - Click
Close on any remaining open attribute windows, then clickSave to save the new Common Web Journey Step itself. - Confirmation of the Common Web Journey Step successfully being updated will show in the bottom-right notification area of the web console. Any checks in flight using the Common Web Journey Step will continue to use the previous configuration.
Removing Common Web Journey Steps
- Login to Web Console and select Web Journey Steps from the main menu.
- Click
Remove on the row of the Common Web Journey Step to amend.
The list of Common Web Journey Steps shown can be filtered by name or description using the search bar. - Click
Remove to confirm you want to delete the selected Common Web Journey Step. - Providing the Common Web Journey Step was not linked to any existing Web Journey Checks, it will now be deleted.
Confirmation of this will be shown in the bottom-right notification area of the web console.
If the Common Web Journey Step was linked to an existing check, a popup error will be shown informing the common step could not be removed for this reason.
Web Journey Step Configuration Definitions
| Name | Description |
|---|---|
| Name | A name to provide context to what the step is doing. This will be used in any alerts or notifications generated from this step. |
| Description | Space if needed to provide a longer description of what this common step is doing. |
| Step Wait Time | The number of milliseconds to wait before starting the step. This can be used to allow for network calls to complete and the page to finish rendering before any actions or checks are executed against it. |
| Warning Page Load Time | The maximum number of milliseconds before the browser reports the readyState as 'complete' for a page load before the step is given a warning status. |
| Alert Page Load Time | The maximum number of milliseconds before the the browser reports the readyState as 'complete' for a page load before the step is considered to have failed. This should be equal to or lower than the Step Wait Time. |
| Page Checks | A list of things to check on the currently focused page. These can range from checking the current URL to checking the attributes or content of elements. See Page Check Configuration Definitions below for details. |
| Alert Suppressions | A list of network calls and console warnings and errors to ignore if they occur to prevent known issues resulting in failed checks. See Alert Suppression Configuration Definitions below for details. |
| Step Actions | A list of actions to perform before progressing to the next step. See Step Action Configuration Definitions below for more details. |
Page Check Configuration Definitions
| Name | Description |
|---|---|
| Description | Space to provide context of what the page check is doing. This is used on alerts and notifications should this check fail. |
| Check Type | The type of check that is to be taken. See Page Check Types below. |
| Warning Only | Toggle this on to indicate that if the check fails, that it will only produce a warning and not fail the whole Web Journey check. |
| Attributes | Click |
Click
Page Check Types
| Name | Description |
|---|---|
| Check for text | Check to see if text is present or not present on the current page. This can also be targeted as specific element tags too. |
| Check for element on page | Check to see if a given element is or isn't on the current page. Elements can be identified using xpath, or the element id or name attribute. The content of the element can also be checked, as well as checking for a specific attribute name or value. |
| Check current URL | Check the current URL matches the rule given. The rule can check part of the URL for text being present or absent, or for absolute matches. |
| Check for URL response | Check for a specific network call has been made, and for the response code returned. |
| Check for console log | Check for console log entries made. These can be filtered by normal logs, or warnings or errors. |
Page Check Type Attributes
| Check Type | Name | Description |
|---|---|---|
| Check for text | Text To Find | The text to search for being present or absent on the current page. |
| Check for text | Element Type | (Optional) You can narrow the search for the Text To Find to specific element tags by providing the name of the element tag to filter by here. |
| Check for text | State | Define if the Text To Find should be present or absent from the page. |
| Check for element on page | XPath To Find | Provide xpath to locate the element on the current page. If the xpath returns multiple elements, the first will be used for evaluation. |
| Check for element on page | Element ID | Give the id of the element to find on the current page. If multiple elements match the id, then the first will be used for evaluation. |
| Check for element on page | Element Name | Give the name of the element to find on the current page. If multiple elements match the name given, then the first will be used for evaluation. |
| Check for element on page | State | Present - The element searched for should be found on the current page. Absent - The element searched for should not be found on the current page. |
| Check for element on page | Object Attribute Name | Check that the found element has the given attribute name. Not applicable if the State is set to Absent. |
| Check for element on page | Object Attribute Value | Check that the attribute given in Object Attribute Name has this value. |
| Check for element on page | Object Content | Check that the found element contains some given text. |
| Check current URL | Current URL Address | The full or partial URL to check against the current page URL. |
| Check current URL | URL Comparison | The way to compare the Current URL Address given against the current page URL. |
| Check for URL response | URL | The URL to search for in the network calls made since the last Web Journey Step. |
| Check for URL response | URL Condition | The way to compare the URL given against the list of network calls made by the web site since the last Web Journey Step. |
| Check for URL response | Warning Response Time | (Optional) If the found network call took longer than number of milliseconds given here then a warning will be given. |
| Check for URL response | Alert Response Time | (Optional) If the found network call took longer than the number of milliseconds given here then this will be considered a failed check and alert accordingly. |
| Check for URL response | Expected Response Code | If the found network call did not return this response code then the check will be considered a failed check and alert accordingly. |
| Check for URL response | Accept Any Information Response Code | Consider the found network call to have succeeded if it returned any response code between 100-199. |
| Check for URL response | Accept Any Success Response Code | Consider the found network call to have succeeded if it returned any response code between 200-299. |
| Check for URL response | Accept Any Redirect Response Code | Consider the found network call to have succeeded if it returned any response code between 300-399. |
| Check for URL response | Accept Any Client Error | Consider the found network call to have succeeded if it returned any response code between 400-499. |
| Check for URL response | Accept Any Server Error | Consider the found network call to have succeeded if it returned any response code between 500-599. |
| Check for console log | Log Level | The log level to filter by, or select Any to just search for any console message. |
| Check for console log | Console Message | The full or part message to search for in the console log output of the current page. |
| Check for console log | Message Comparison | Define how to compare the Console Message value given against the list of console messages on the current web page. |
Alert Suppression Configuration Definitions
| Name | Description |
|---|---|
| Description | Space to indicate what the given suppression is doing or why its suppressed. |
| Suppression Type | Select to suppress a network call from producing a warning or failure should it be taking too long or produce a error response, or to suppress any console warnings or errors being written out by the web application. |
| Attribute | Click |
Click
Alert Suppression Attributes
| Suppression Type | Name | Description |
|---|---|---|
| Network | URL | The full or part URL to suppress errors from. This is matched against the list of error network calls found using the URL Condition option given. |
| Network | URL Condition | The way to compare the URL given against the list of logged failed network calls captured. |
| Network | Expected Response Code | Provide a specific response code to suppress. Only response codes from 400 and above are reported as errors. |
| Network | Accept Any Client Error | Suppress any response error codes between 400-499. |
| Network | Accept Any Server Error | Suppress any response error codes between 500-599. |
| Console | Log Level | Filter the console messages to suppress by their log level, or select Any for both warning and error messages. |
| Console | Console Message | The full or part console message to suppress. This is compared against the list of console warnings and errors using the Match Condition given. |
| Console | Match Condition | The way to compare the Console Message given against the list of captured console warnings and errors. |
Step Action Configuration Definitions
| Name | Description |
|---|---|
| Sequence | These define the order in which the actions will be run, working in ascending order. |
| Interaction Description | Space to provide a description of what the action is doing. If the action failed, this will be what is described in the alert or notification. |
| Action | The type of action to perform. Descriptions of these can be found under Step Action Definitions. |
| Always Required | If this is toggled on, the action must always be able to run during the check. If toggled off then if it failed, it's failure will be ignored, allowing for optional actions such as closing intermittent popups. |
| Settings | Click |
Click
Step Action Definitions
| Name | Description |
|---|---|
| Click | Left click on an element on the page. This will always target clicking on the middle of the found element. |
| Double Click | Double click on an element on the page. This will always target clicking on the middle of the found element. |
| Right Click | Right click on an element on the page. This will only work for DOM events handling right clicks, and will not load the browser context menu. |
| Text Input | Send text input to a selected element on the page. |
| Password Input | The same as Text Input, however the given value to input is encrypted at rest and will not be mentioned in alerts or notifications. |
| Select Option from List/Choice | Select a value on the current page that is presented in a select element. This currently only supports the selecting of a single value on inputs that allow multiple to be selected. |
| Change Window (by opening order) | Switch the focus of further checks and actions to be against another window that has opened during the course of the web journey, targeting it by the order number in which is opened, with 0 being the initial window the check started on. |
| Change Window (by title) | Switch the focus of further checks and actions to be against another window that has opened during the course of the web journey, targeting it by the title of the window. If multiple windows have the same title, the first found will be used. |
| Navigate to URL | Manually navigate to a different URL, the same as changing the address in the address bar. |
| Wait | Make the web journey wait for a given time. This can be useful if a prior action needs to wait for something to complete on the page. |
| Refresh Page | Trigger a full page reload, the same as clicking the refresh button on a browser. |
| Close Window | Close the currently focused window. The check will then default back to the window originally launched for the check. If the original window is closed and further actions are attempted to be taken, then the check will fail. |
| Change iFrame (by order number) | Switch focus to an iframe on the current window by the order number its found on the page. Use 0 to indicate switching back to the main page. This needs to be used if you want to perform actions against something within an iframe. |
| Change iFrame (by xpath) | Switch focus to an iframe on the current window, using xpath to locate it on the current page. This needs to be used if you want to perform actions against something within an iframe. |
| Scroll to Element | Scroll down to an element on the page. |
| Take Screenshot | Save a screenshot of what is currently showing. This is limited to the current windows viewport, so will not include parts of the webpage that are off the screen. These are automatically captured at the end of every Web Journey Step, but additional screenshots can be added here. The screenshot will show as an additional screenshot in the Check Results. |
| Save DOM | Save the Document Object Model of the page currently shown. These are automatically saved at the end of every Web Journey Step, but additional saves can be added here. These will show as additional Saved DOMs on the Check Results. |
Action Settings Definitions
| Action | Name | Description |
|---|---|---|
| Click Double Click Right Click |
XPath | The xpath of the element to click on. If the xpath returns multiple elements then the first one will be used. |
| Click Double Click Right Click |
Search Text | As an alternative to searching by xpath, just searching for specific text on the current page to click on. The first occurrence of this text will be used. Specific elements can also be targeted in conjunction to this using the Element Type field. |
| Click Double Click Right Click |
Element Type | This can be used in conjunction to the Search Text option to limit the area the text search applies to only the specific element tags given here. |
| Text Input | Input Xpath | Identify the element on the page to input the given text into using the xpath given here. If the xpath finds multiple elements, the first one found will be used. |
| Text Input | Element Id | Identify the element on the page to input the given text into using the elements id. If multiple elements have the same id then the first on the page will be used. |
| Text Input | Element Name | Identify the element on th page to input the given text into using the elements name. If multiple elements have the same name then the first on the page will be used. |
| Text Input | Input Text | The text to input into the element found. |
| Password Input | Input Xpath | Identify the element on the page to input the given password into using the xpath given here. If the xpath finds multiple elements, the first one found will be used. |
| Password Input | Element Id | Identify the element on the page to input the given password into using the elements id. If multiple elements have the same id then the first on the page will be used. |
| Password Input | Element Name | Identify the element on th page to input the given password into using the elements name. If multiple elements have the same name then the first on the page will be used. |
| Password Input | Input Password | The password to input to the element found. This will be encrypted at rest and not included in any alerts or notifications if the action fails. Additionally this will not be given if the check is exported, or through any API responses. |
| Select Option from List/Choice | Select Input Xpath | Identify the element on the page to select the option from using the xpath given here. If the xpath finds multiple elements then the first one found will be used. |
| Select Option from List/Choice | Select Input Id | Identify the element on the page to select the option from using its name attribute. If multiple elements have the same id attribute then the first one on the page will be used. |
| Select Option from List/Choice | Select Option Index | Select the value in the list by its position in the list, working from 0 as the first option in the list in ascending order. |
| Select Option from List/Choice | Select Option Name | Select the value in the list by its name shown on screen. |
| Select Option from List/Choice | Select Option Value | Select the value in the list by its value attribute. |
| Change Window (by opening order) | Window Id | Select the window to change focus to using the order number in which it opened, 0 being the initially launched window as part of the check. |
| Change Window (by title) | Window Title | The title of the window to switch focus to. This should be an exact match. If multiple windows have a matching title then the first one opened is used. |
| Navigate to URL | URL | The URL to navigate to. |
| Wait | Wait Time | The number of milliseconds to wait before continuing onto the next action or Web Journey Step if it's the last action to run. |
| Change iFrame (by order number) | Iframe Order Number | The iframe to switch focus to by the order number it is rendered on the page. 0 indicates the 'main' window, so outside of all iframes. |
| Change iFrame (by xpath) | Iframe Xpath | The xpath to identify the iframe to switch focus to. If the xpath returns multiple iframes then the first one found will be used. |
| Scroll to Element | XPath | The xpath of the element to scroll to. If multiple elements are returned by the xpath then the first one will be used. |
| Scroll to Element | Search Text | Search for text on the page to scroll too. The first match will be used, but results can be filtered further by targeting a certain type of element using the Element Type option. |
| Scroll to Element | Element Type | The element/tag type to filter the Search Text by. |